古墓丽影1 tomb raider 古墓丽影2 西安匕首 tomb raider The Dagger of Xi'an 古墓丽影3 劳拉的冒险 tomb raider Adventures of Lara Croft 古墓丽影4 最后的启示 tomb raider The Last Revelation 古墓丽影5 历代记 tomb raider Chronicles 古墓丽影6 黑暗天使 tomb raider The Angel of Darkness 古墓丽影7 传奇 tomb raider Legend
Tomb Raider
古墓丽影1

The Dagger of Xi'an
古墓丽影2:西安匕首

Adventures of Lara Croft
古墓丽影3:劳拉的冒险

The Last Revelation
古墓丽影4:最后的启示

Tomb Raider: Chronicles
古墓丽影5:历代记

The Angel of Darkness
古墓丽影6:黑暗天使

Tomb Raider: Legend
古墓丽影7:传奇

古墓丽影 周年纪念 tomb raider Anniversary
古墓丽影8 地下世界 tomb raider Underworld
劳拉与光之守护着 光明守护者 Lara Croft and The Guardian Of Light
古墓丽影9 tomb raider 2013
劳拉与奥西里斯神庙 Lara Croft and the Temple of Osiris
古墓丽影:崛起 Rise of The Tomb Raider
古墓丽影:暗影 Shadow of the Tomb Raider

Tomb Raider: Anniversary
古墓丽影:十周年纪念版

Tomb Raider: Underworld
古墓丽影8:地下世界

LCGOL
劳拉与光之守护者

TOMB RAIDER
古墓丽影9

LCTOO
劳拉与奥西里斯神庙

Rise of The Tomb Raider
古墓丽影10:崛起

Shadow of the Tomb Raider
古墓丽影11:暗影

古墓丽影对战地图推荐周(英文稿)

发表时间:2013/03/06 00:00:00  来源:“ZZer”转载  作者:古墓丽影官方  浏览次数:1890  
字体大小: 【小】 【中】 【大】

官方将本周作为古墓丽影对战地图的推荐周,将陆续介绍《古墓丽影9》多人模式的五个对战地图。

原文:


Tomb Raider Multiplayer Map Week

你知道古墓丽影的多人对战地图么?由Eidos蒙特利尔团队进行开发的五款特殊地图使你能与朋友在古墓丽影世界中组队或者对战。我们将于每周五公布一部地图,因此玩家可在周末游戏时取得先机!
How well do you know Tomb Raider’s multiplayer maps? Developed with care by the team at Eidos Montreal, Tomb Raider launches with five unique maps for you to take on with (or against) your friends. We’ll highlight one a day through Friday so you can gain the upper hand this weekend!

地图1:峡谷
Map #1: Chasm
Tomb Raider Multiplayer Map Week How well do you know Tomb Raider’s multiplayer maps? Developed with care by the team at Eidos Montreal, Tomb Raider launches with five unique maps for you to take on with (or against) your friends. We’ll highlight one a day through Friday so you can gain the upper hand this weekend! Map #1: ChasmWind has wiped most of this once-picturesque outpost clean. The sands have stripped off paint off anything and everything. All that remains are the wooden skeletons of the previously grand buildings and towers. At the north end of this map there is a large bell. There is a crank that will ring a bell and summon a blinding windstorm. Map Features Windstorm: When the player rings the bell, the windstorm will come and blow sand across the level reducing visibility for everyone. However, the team that activated the bell will see the gamer tags of the opposing team—useful when coordinating an attack. Traps: Spike trap, snare trap, exploding barrels, rock falls. There is a good mix of traps in the open and underground areas of this map. Long zip lines: There is a tower on the Solarii side of the map that is between two zip lines, it is great to attack or defend certain areas of the map. There is a long zip line that leads from the Survivor drop zone to the bell. This is an extremely useful way to get around the map for the Solarii. Mode Strategies Ring the bell: Always good for your team—tap survival instinct to see a bit better. Survivors will do well to use the tunnels and stay underground as much as possible, but careful of the traps. Solarii will do well by using the ascenders to get around the map and by destroying the large grid under the bell. Anyone under the debris when it falls will be killed—especially useful in cry for help.

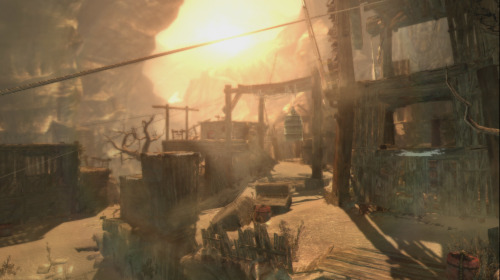
狂风侵蚀了这个曾经风景如画的村落,沙尘剥离了万物的生机。只有曾经巍峨的建筑和高塔的骨架残骸被遗落在这片大地上。在地图南部的尽头有一口巨钟。一只曲柄将会奏响这口巨钟,并引起一场炫目的风暴。
Wind has wiped most of this once-picturesque outpost clean. The sands have stripped off paint off anything and everything. All that remains are the wooden skeletons of the previously grand buildings and towers. At the north end of this map there is a large bell. There is a crank that will ring a bell and summon a blinding windstorm. 

地图特点
Map Features

  • 风暴:当玩家奏响巨钟时,风暴袭来并用沙砾席卷这个平原,降低所有人的能见度。然而激活巨钟的队伍将可以看到敌方队伍的玩家标签——这将在组织一场奇袭时发挥效用。
    Windstorm: When the player rings the bell, the windstorm will come and blow sand across the level reducing visibility for everyone. However, the team that activated the bell will see the gamer tags of the opposing team—useful when coordinating an attack.
  • 陷阱:尖刺陷阱,诱捕陷阱,爆炸桶,落石。这个地图的开放区域和地下区域中,集合着难以计数的陷阱。
    Traps: Spike trap, snare trap, exploding barrels, rock falls. There is a good mix of traps in the open and underground areas of this map.
  • 长飞索:在地图的Solarii这一侧,两条飞索之间有一座塔,是用于攻击和防守地图特地区域的绝佳地点。从幸存者的进入游戏的区域有一条长长的飞索直通巨钟。这是避开Solarii所在区域的绝佳方式。
    Long zip lines: There is a tower on the Solarii side of the map that is between two zip lines, it is great to attack or defend certain areas of the map. There is a long zip line that leads from the Survivor drop zone to the bell. This is an extremely useful way to get around the map for the Solarii.

策略模式:
Mode Strategies

  • 鸣钟:对队伍有益无害——点击“生存本能”可以获得更好的视野。
    Ring the bell: Always good for your team—tap survival instinct to see a bit better.
  • 幸存者善于利用隧道并尽可能的呆在地下,但是要小心陷阱。
    Survivors will do well to use the tunnels and stay underground as much as possible, but careful of the traps.
  • Solarii善于利用绳索器在地图上随意移动并且破坏钟下巨大的栅格。任何位于其下,被碎片击中的人将必死无疑。
    Solarii will do well by using the ascenders to get around the map and by destroying the large grid under the bell. Anyone under the debris when it falls will be killed—especially useful in cry for help.
  • Tomb Raider Multiplayer Map Week How well do you know Tomb Raider’s multiplayer maps? Developed with care by the team at Eidos Montreal, Tomb Raider launches with five unique maps for you to take on with (or against) your friends. We’ll highlight one a day through Friday so you can gain the upper hand this weekend! Map #2: Monastery The monastery is in a quiet and desolate place at the top of a mountain. Its nearly monochromatic palette conjures a feeling of peace and calm, but don’t be fooled. Earthquakes have weakened the foundations of the natural rock formations of this area, and the Solarii has rigged them all. Any damage to these weak points and the bridges will start to collapse. Be careful of falling debris, it is deadly. Map Features Highly defensible monastery building with a main gate that can be manually opened or closed. Destructible land bridges: These bridges are very useful to the Survivors, especially in Rescue. Traps: Spike trap, snare trap, exploding barrels, rock falls. While this level feels desolate, there are many traps around that can be deadly. Mode Strategies Survivors would do well to control the land bridges near their spawn. There are many zip lines that terminate there and controlling that area will help them defeat the Solarii. Solarii would do well to destroy the land bridges, especially at strategic times (killing survivors), arm the spike traps often, and use the monastery building as good cover to assault the Survivors in any mode. On the side of the map there is a small alcove with a long zip line that leads deep into Survivor territory. If it is poorly guarded, it is an excellent way in and out of that zone.

    Tomb Raider Multiplayer Map Week

    How well do you know Tomb Raider’s multiplayer maps? Developed with care by the team at Eidos Montreal, Tomb Raider launches with five unique maps for you to take on with (or against) your friends. We’ll highlight one a day through Friday so you can gain the upper hand this weekend!

    Map #2: Monastery

    The monastery is in a quiet and desolate place at the top of a mountain. Its nearly monochromatic palette conjures a feeling of peace and calm, but don’t be fooled. Earthquakes have weakened the foundations of the natural rock formations of this area, and the Solarii has rigged them all. Any damage to these weak points and the bridges will start to collapse. Be careful of falling debris, it is deadly. 

    Map Features

    • Highly defensible monastery building with a main gate that can be manually opened or closed.
    • Destructible land bridges: These bridges are very useful to the Survivors, especially in Rescue.
    • Traps: Spike trap, snare trap, exploding barrels, rock falls. While this level feels desolate, there are many traps around that can be deadly.

    Mode Strategies

    • Survivors would do well to control the land bridges near their spawn. There are many zip lines that terminate there and controlling that area will help them defeat the Solarii.
    • Solarii would do well to destroy the land bridges, especially at strategic times (killing survivors), arm the spike traps often, and use the monastery building as good cover to assault the Survivors in any mode.
    • On the side of the map there is a small alcove with a long zip line that leads deep into Survivor territory. If it is poorly guarded, it is an excellent way in and out of that zone.

Tomb Raider Multiplayer Map Week How well do you know Tomb Raider’s multiplayer maps? Developed with care by the team at Eidos Montreal, Tomb Raider launches with five unique maps for you to take on with (or against) your friends. We’ll highlight one a day through Friday so you can gain the upper hand this weekend! Map #3: Shrine Quiet and cold, the shrine is in excellent condition despite its age. While most of the island has already been overrun and destroyed by the Solarii this place is deserted, aside from a few lanterns that cast a golden hue over the structures. Map Features Flaming lanterns: Many of the lanterns in the map are destructible, once destroyed they will spill their oil on the ground and cause a fire hazard. Traps: Spike trap, snare trap, exploding barrels. The traps in this level are well hidden, exploding barrels populate most of the outdoor areas of the map, while the snare traps and spike traps threaten players in the shrine itself. Mode Strategies This map is really all about the shrine. For both teams controlling the shrine will be key to all game modes. There are twisting and turning paths and lots of destructible shutters that create even more portals in and out of the building. Survivors will do well in Rescue mode by coordinating together and clearing one of the three paths back to the drop zone. The rock staircase has a lot of cover and is usually the best bet, but if there is a concentration of Solarii there, sometimes the main bridge out in the open is best. Solarii in rescue will have a particular use for a rocky perch above the central bridge of the level. There is a leap of faith the player can jump onto a zip line that will lead to the Survivor drop zone and then—using the ascender—quickly retreat.


Tomb Raider Multiplayer Map Week 

How well do you know Tomb Raider’s multiplayer maps? Developed with care by the team at Eidos Montreal, Tomb Raider launches with five unique maps for you to take on with (or against) your friends. We’ll highlight one a day through Friday so you can gain the upper hand this weekend!

Map #3: Shrine 
Quiet and cold, the shrine is in excellent condition despite its age. While most of the island has already been overrun and destroyed by the Solarii this place is deserted, aside from a few lanterns that cast a golden hue over the structures. 

Map Features

  • Flaming lanterns: Many of the lanterns in the map are destructible, once destroyed they will spill their oil on the ground and cause a fire hazard.
  • Traps: Spike trap, snare trap, exploding barrels. The traps in this level are well hidden, exploding barrels populate most of the outdoor areas of the map, while the snare traps and spike traps threaten players in the shrine itself.

Mode Strategies

  • This map is really all about the shrine. For both teams controlling the shrine will be key to all game modes. There are twisting and turning paths and lots of destructible shutters that create even more portals in and out of the building.
  • Survivors will do well in Rescue mode by coordinating together and clearing one of the three paths back to the drop zone. The rock staircase has a lot of cover and is usually the best bet, but if there is a concentration of Solarii there, sometimes the main bridge out in the open is best.
  • Solarii in rescue will have a particular use for a rocky perch above the central bridge of the level. There is a leap of faith the player can jump onto a zip line that will lead to the Survivor drop zone and then—using the ascender—quickly retreat.

Tomb Raider Multiplayer Map Week How well do you know Tomb Raider’s multiplayer maps? Developed with care by the team at Eidos Montreal, Tomb Raider launches with five unique maps for you to take on with (or against) your friends. We’ll highlight one a day through Friday so you can gain the upper hand this weekend! Map #4: Beach Near the rocky shore of the island there is a clearing - a dangerous and open place full of twists and turns. It boasts the most verticality of any of the maps and a brutal lightning storm. The lighting will hit the area randomly and spread fires. Also, there are lighting rods scattered throughout the map and once activated they will kill any enemy who wanders by with a bolt from the sky. Map Features Sniper’s Paradise: Many places to hide high up and snipe unsuspecting players. Lightning Rods: Unique to this map, the lightning rods are a great way to do some crowd control. Traps: Spike trap, snare trap, exploding barrels, rock falls, propane tanks and turret. This level has tons of ingredients—watch your step. Use your survival instinct to see the rock falls. Mode Strategies Survivors would do well by controlling the central tunnel near their spawn point in most modes. Arm the spike traps and be careful, there are four ways into the complex so stay sharp. The Solarii should use the verticality and abundant zip lines to their advantage. Sniping from a distance with a bow will yield good results, but some traps near the entrances and exits of the lower tunnel won’t hurt either.

Tomb Raider Multiplayer Map Week

How well do you know Tomb Raider’s multiplayer maps? Developed with care by the team at Eidos Montreal, Tomb Raider launches with five unique maps for you to take on with (or against) your friends. We’ll highlight one a day through Friday so you can gain the upper hand this weekend!

Map #4: Beach

Near the rocky shore of the island there is a clearing - a dangerous and open place full of twists and turns. It boasts the most verticality of any of the maps and a brutal lightning storm. The lighting will hit the area randomly and spread fires. Also, there are lighting rods scattered throughout the map and once activated they will kill any enemy who wanders by with a bolt from the sky.

Map Features

  • Sniper’s Paradise: Many places to hide high up and snipe unsuspecting players.
  • Lightning Rods: Unique to this map, the lightning rods are a great way to do some crowd control.
  • Traps: Spike trap, snare trap, exploding barrels, rock falls, propane tanks and turret. This level has tons of ingredients—watch your step. Use your survival instinct to see the rock falls.

Mode Strategies

  • Survivors would do well by controlling the central tunnel near their spawn point in most modes. Arm the spike traps and be careful, there are four ways into the complex so stay sharp.
  • The Solarii should use the verticality and abundant zip lines to their advantage. Sniping from a distance with a bow will yield good results, but some traps near the entrances and exits of the lower tunnel won’t hurt either. 


Tomb Raider Multiplayer Map Week How well do you know Tomb Raider’s multiplayer maps? Developed with care by the team at Eidos Montreal, Tomb Raider launches with five unique maps for you to take on with (or against) your friends. We’ll highlight one a day through Friday so you can gain the upper hand this weekend! Map #5: Underground When the Japanese surrendered at the end of the Second World War, three of their four nuclear submarines were destroyed by the Allies. A I-403 Submarine, the forth, was never found, hidden in an underground base on the island. The submarine holds another deadly secret: when the base was abandoned the officers initiated a self-destruct sequence on the submarine but, due do a power disruption, the final countdown was never started. During the match in this tight and tense level, the power will be returned to the sub and a doorway will open. The first team to activate the self-destruct will set the match time to 2:00—who will win? Map Features Small, intense and tight map layout: Lots of corridors, trouble at every turn. Self-destruct: Team that activates this event will gain XP and credit for any kills it causes. Traps: Snare trap, exploding barrels, shotgun barriers, propane tanks and turret. The biggest danger in this level is the other players due to the layout and quick immersion in the combat. Destructible bridge: The central bridge can be weakened and caused to collapse. When the power on the bridge is on and it is destroyed it will create an electrical field that inflicts damage over time to any player on the bridge—cross at your own risk. Use instinct mode to find the switches. Mode Strategies Keep moving: The map has tight corridors and blocked off side paths that are useful to a skilled player. Shoot your way through the barriers and collect as many special ammunition drops as you can. Use the self-destruct: If you’re in the lead, or have a chaotic personality, push that button. It will reset the time to 2:00. This will add or subtract time to the match depending on when it is pushed. In free for all and team death match kills you get from this event count as points—lots of fun in free for all. Destroy the bridge and electrify it.


Tomb Raider Multiplayer Map Week

How well do you know Tomb Raider’s multiplayer maps? Developed with care by the team at Eidos Montreal, Tomb Raider launches with five unique maps for you to take on with (or against) your friends. We’ll highlight one a day through Friday so you can gain the upper hand this weekend!

Map #5: Underground

When the Japanese surrendered at the end of the Second World War, three of their four nuclear submarines were destroyed by the Allies. A I-403 Submarine, the forth, was never found, hidden in an underground base on the island. The submarine holds another deadly secret: when the base was abandoned the officers initiated a self-destruct sequence on the submarine but, due do a power disruption, the final countdown was never started. During the match in this tight and tense level, the power will be returned to the sub and a doorway will open. The first team to activate the self-destruct will set the match time to 2:00—who will win?

Map Features

  • Small, intense and tight map layout: Lots of corridors, trouble at every turn.
  • Self-destruct: Team that activates this event will gain XP and credit for any kills it causes.
  • Traps: Snare trap, exploding barrels, shotgun barriers, propane tanks and turret. The biggest danger in this level is the other players due to the layout and quick immersion in the combat.
  • Destructible bridge: The central bridge can be weakened and caused to collapse. When the power on the bridge is on and it is destroyed it will create an electrical field that inflicts damage over time to any player on the bridge—cross at your own risk. Use instinct mode to find the switches.

Mode Strategies

  • Keep moving: The map has tight corridors and blocked off side paths that are useful to a skilled player. Shoot your way through the barriers and collect as many special ammunition drops as you can.
  • Use the self-destruct: If you’re in the lead, or have a chaotic personality, push that button. It will reset the time to 2:00. This will add or subtract time to the match depending on when it is pushed. In free for all and team death match kills you get from this event count as points—lots of fun in free for all.
  • Destroy the bridge and electrify it.
文章评论
发表评论:(匿名发表无需登录,已登录用户可直接发表。) 登录状态: 未登录,点击登录


官方网站列表:TombRaider LaraCroft Tumblr Facebook(TR) Facebook(LC) YouTube Twitter(TR) Twitter(LC) Store Instagram
“古墓丽影”是古墓丽影官方认证的粉丝网站,并非官方网站。以下为“古墓丽影”旗下网站及社交媒体入口:


本站QQ群47617654


古墓丽影兴趣部落
古墓丽影中国LOGO

本站官方微博


微信号tombraidercn

tombraider.cn gmly.com 古墓丽影.com 古墓丽影.net 古墓丽影.中国 twitter.com/TombRaiderCN tombraider-china.tumblr.com
互联网ICP备案:蜀ICP备14017735号-1 ©Lara Croft and Tomb Raider are trademarks or registered trademarks of Square Enix Ltd. 全球网站目录